Showing posts with label simple. Show all posts
Showing posts with label simple. Show all posts
Friday, January 10, 2014
Simple Unipolar to Dual Supply Converter Circuit Diagram
Simple Unipolar to Dual Supply Converter Circuit Diagram. 817V The outputs in this circuit are independently variable and can be loaded unsymmetrically. The output voltage remains constant, irrespective of load and changes. By varying potentiometers R2 or R6, the output voltages can be conveniently set. Outputs can be varied between 8 and 17 V, so that the standard ±9, ±12, and ±15 V settings can be made.
Unipolar to Dual Supply Converter Circuit Diagram

This converter is designed for a maximum load current of 1 A and the output impedance of both supplies of 0.35 0. This circuit is not protected against shortcircuits, but uses the protection provided by the de input source. This circuit is ideal for biassing operation amplifier circuits.

Wednesday, December 25, 2013
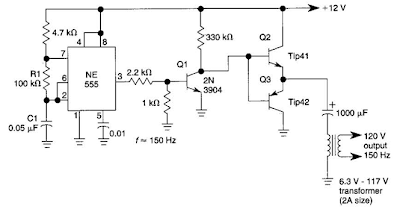
Simple Dc Ac Inverter Circuit Diagram
This dc-to-ac inverter is based on the popular 555. A 555 oscillator circuit drives a buffer amplifier consisting of Ql, Q2, and Q3.
The circuit operates at 150 to 160 Hz. Tl can be a 6.3-V or 12.6-V filament transformer as applicable.The frequency can be changed by changing the values of Rl and/or Cl.
Simple Dc/Ac Inverter Circuit Diagram
Monday, December 23, 2013
Simple RF Transmitter for PIR Sensors Circuit Diagram
This is the Simple RF Transmitter for PIR Sensors Circuit Diagram.

Sunday, December 22, 2013
Simple 2304 and 3456 MHz Power Amplifiers Circuit Diagram
This is a Simple 2304 and 3456 MHz Power Amplifiers Circuit Diagram

Thursday, December 19, 2013
Simple Automatic Water Pump Controller Circuit Diagram
Simple Automatic Water Pump Controller Circuit Diagram is a series of functions to control the Automatic Water Pump Controller Circuit in a reservoir or water storage. As the water level sensor made with a metal plate mounted on the reservoir or water tank, with a sensor in the short to create the top level and a detection sensor for detecting long again made the lower level and ground lines connected to the bottom of reservoirs or reservoir.
The series of automatic water pump controller is designed with 2 inputs NOR by 4 pieces and relay that is activated by the transistor. Automatic water pump circuit requires +12 VDC voltage source and can be used to control the water pump is connected to AC power . Here is the complete series of pictures.
Automatic Water Pump Controller Circuit Diagram

working principle series of automatic water pump controller above is. At the time the water level is below both sensors, the output IC1C (pin 10) will be LOW, Kemudin when the water began to touch the lower level sensor, the output IC1C (pin10) remains LOW until the water touches the sensor level above, then the output IC1C (pin 10) going HIGH and active relay through Q1 and turn on the water pump to meguras reservoir.
At the muli down and water level sensors for water untouched MKA IC1C output (pin 10) remains HIGH until the new water untouched semuasensor IC1C output (pin 10) LOW and water pump died. The series of automatic water pump controller is equipped with SW1 which serves to reverse the logic of drains (the output of IC1C) and the concept of water supplied (output dri IC1D).
When SW1 is connected to IC1D the water pump will turn on when the water does not touch all the sensors and will die when all the sensors tesentuh water. Automatic water pump controller can be used to fill or drain the water according to which mode is selected via SW1.
List Component Automatic Water Pump Controller
R1 = 15K
R2 = 15K
R3 = 10K
R4 = 1K
D1 = LED
D2 = 1N4148
Q1 = BC337
IC1 = 4001
SW = SPDT Switches
Relay RL1 = 12V
Thursday, September 26, 2013
Super Simple 3 Watt Audio Power Amplifier
Here is the circuit diagram of superb mini audio power amplifier, That can be power with 4.5 volt dc to 18 volts dc (maximum). This amplifier is based on TDA1015, Product of NXP Semiconductors formerly PHILIPS Semiconductors. The TDA1015 is a monolithic integrated audio amplifier circuit in a 9-lead single in-line (SIL) plastic package. The device is especially designed for portable radio and recorder applications and delivers up to 4 watt in a 4 ohm load impedance. The very low applicable supply voltage of 3,6 V permits 6 V applications.
Parts:
R1330K
R25.6K
R34.7R
C11uF-25V
C21uF-25V
C3100pF
C4100nF-63V
C5182pF
C6224pF
C7100uF-25V
C8100nF-63V
C910uF-25V
C101KuF-25V
IC1TDA1015
Applications:
Read More..
 |  |
click on the images to enlarge | |
R1330K
R25.6K
R34.7R
C11uF-25V
C21uF-25V
C3100pF
C4100nF-63V
C5182pF
C6224pF
C7100uF-25V
C8100nF-63V
C910uF-25V
C101KuF-25V
IC1TDA1015
Applications:
- In-car use
- Your own unique application
- Power amplifier for audio projects
- For use with portable audio equipment
- Small but powerful multi-purpose amplifier
- Low current drain
- High output power
- Thermal protection
- High input impedance
- Separated preamplifier and power amplifier
- Limited noise behavior at radio frequencies
- Single in-line (SIL) construction for easy mounting
- Quiescent current : 12mA
- Thermal and short circuit protection
- Frequency Response : 60Hz - 15Khz
- Max. output power : 3W (4ohm/12V)
- Input sensitivity : 20-15mV selectable
- Power supply : 4.5 - 15V DC @ 400mA
Tuesday, September 10, 2013
Simple Subwoofer Lowpass Filter using uA741 Single Op Amp Ic
This is the simplest Sub woofer Low Pass filter Circuit using uA741 single op amp ic.The circuit is very low cost with respect to their work. The cut off frequency of this circuit is 25Hz to 80Hz maximum.
Using this circuit , you can easily design a 2.1 Sub-woofer Speaker System at your own Home. The circuit contains very few components.In Pakistan, the cost of this circuit with PCB is Rs:45. The same circuit is working in my own hand made sub-woofer system.So Try this
Sub-woofer Low-pass Filter using uA741 Single Op-Amp Ic Circuit Diagram

R1,R3,R4 = 10K 1/4W
R2=100K 1/4W
CY1,CY2 = 0.22uF Polyester
C1,C2 = 10uF/25V Electrolytic
IC1 = uA741A Single Op-Amp Ic + 8 Pin Ic Socket
3 Pin Male & Female Connector x 2
2 Pin Male & Female Connector x 1
PCB as in required size 4.5 cm x 3.4 cm
Subscribe to:
Posts (Atom)